Saturday, December 1, 2012

Seveenteen Principles of Success

1. Develop Definiteness of Purpose
  • Determine and fix in your mind exactly what you desire'
  • Evaluate and determine exactly what you will give in return
  • Set a definite date for exactly when you intend to possess your desire
  • Identify your desire with a definite plan for carrying out and acheiving your objective.  Put your plan into action at once.
  • Clearly define your plan for achievement. Write out precisely and concisely exactly what you want, exactly when you want to achieve it, and exactly what you intend to give in return.
  • Each and every day, morning and evening, read your written statement aloud.  As you read it, see, feel, and believe yourself already in possession of your objective. 
  • Engage in personal inspection with regularity to determine whether you are on the right track and headed in the right direction so that you don't deviate from the path that leads to the achievement of your objective. 
  • To guarentee sucess, engage daily in study, thinking, and planning time with PMA regarding yourself and family and how you can achieve your definite goals.   
2. Establish Mastermind Alliance
3. Assemble an Attractive Personality
4. Use Applied Faith
5. Go the Extra Mile
6. Create Personal Initiative
7. Build a Positive Mental Attitude
  • A positive mental attitude is the right, honest, constructive thought, action, or reaction to any person or set of circumstances that does not violate the laws of God or the rights or one's fellow man.
  • A positive mental attitude allows you to build on hope and overcome the negative attitudes of despair and discouragement. It gives you the mental power, the feeling, the confidence to do anything you make your mind up to do. 
  • Maintain the right attitude - a positive mental attitude. 
8. Control Your Enthusiasm
9. Enforce Self-Discipline
10. Think Accurately
11. Control Your Attention
12. Inspire Teamwork
13. Learn from Adversity and Defeat
  • Every adversity carries with it the seed of an equivalent or greater benefit.
  • Defeat my be a stepping stone or stumbling block according to your mental attitude and how you relate it to yourself.  It is never the same as failure until it has been accepted as such.
  • The person with a positive mental attitude reacts to defeat with a spirit of determination not to accept it.
  • The person with a negative mental attitude reacts to defeat in the spirit of hopeless acceptance.
  • The worst thing that can happen to you may be the best thing that can happen to you if you don't let it get the best of you.
14. Cultivate Creative Vision
15. Maintain Sound Health
16. Budget Your Time and Money
  • Take inventory of yourself and activities so that you discover where and how you are spending your time and your money.
  • Engage in study, thinking and planning time.
  • Ten percent  of all you earn is yours to keep and invest.
  • Like a good business, budget your money
  • Develop a plan for the use of your income for expenses, savings, and investments.
  • You don't always get what you want unless you inspect.
17. Use Cosmic Habit Force
  • You are ruled by your habits, it takes a habit to replace a habit.
  • Develop positive habits that will be inharmony with the achievement of your definite purpose or goal.
  • Sow an act, and you reap a habit.
  • Sow a habit, and you reap a character.
  • Sow a charactier, and you reap a destiny.


Friday, November 23, 2012

Just for Today

1.  Just for today, I will be happy.  Happiness is from within, it is not a matter of externals.
2. Just for today, I will try to adjust myself to what is, and not try to adjust everything to my own desires. I will take my family, business, and my luck as they are and fit myself to them.
3. Just for today, I will take care of my body.
4. Just for today, I will try to strengthen my mind.
5. Just for today, I will exercise my soul in three ways; I will do someone a good turn and not get found out. I will do two things I don't want to do, as William James suggests, just for exercise.
6. Just for today, I will be agreeable.
7. Just for today, I will try to live through this day only, not to tackle my whole life problem at once.
8. Just for today, I will have a program.
9. Just for today, I will have a quiet half-hour all by myself and relax.
10. Just for today I will be unafraid, especially I will not be afraid to be happy, to enjoy what is beautiful, to love, and to believe that those I love, love me.

Written by Sybil F. Partridge

If we want to develop a mental attitude that will bring us peace and happiness, here is Rule 1:

Think and act cheerfully, and you will feel cheerful.

Tuesday, November 20, 2012

My Dad Used to Say

She makes me nervous - gets on my nerves...

I wonder if this was his way of expressing feelings of anxiety...

Thursday, November 1, 2012

What to keep and what to toss

Toss Immediately

Credit Card Solicitations
Marketing materials included in bank and credit card statements

Throw out after one month or when you reconcile with a bill or bank statement

ATM receipts
Prospectus and other information about investments you are considering making (if you are not going to read them, toss immediately)
Receipts for purchases (assuming you're keeping them or there's no warranty)

Throw out after one year or when end-of-year consolidated statements come in and you have filed the taxes for that year:

Bank statements
Brokerage statements
Cell phone, cable, telephone, and Internet statements (except when deducting for work-related expenses)
Pay stubs
Social Security Statements
Utility Bills

Throw out after seven years (when no longer needed for tax purposes)

Child-care records
Flexible spending account documentation
401(k) and other retirement-plan year-end statements
IRA contributions
Purchase records for investments
Records of charitable donations
Records on houses you've sold
Tax returns and backup documentation

Keep as long as you have the underlying asset (such as a house or a car)

Insurance policies
Receipts for important purchases like technology, art, antiques, rugs, jewlery (or anything else you may need a rider on  your insurance policy to cover)
Receipts for renovations or other investments made in the property.
Titles
Warranty Papers

Keep forever in a safe or safe-deposit box; keep a second copy-if possible-in your attorney's office or another safe location off-premises:

Adoption papers
Appraisals
Birth certificates
Citzenship papers
Custody agreements
Deeds
Divorce papers
Financial aid documents
List of credit car numbers, bank and brokerage statements, and insurance policies, and toll-free contact information.
List of important contacts (lawyer, accountant, doctor, children, parents, etc)
Military records
Powers of attorney (medical and financial)

Intermittent upkeep

Every time you open a new account, take out a new insurance policy, or do something that requires record keeping, immediatly make a new folder.  Print a label, and figure out where the folder goes.  The first thing in the folder is the new contract you've signed so if you every have to refer to it you know exactly where to go.

Annual upkeep

Every year, after you've filed your taxes, remove last year's manila folders from the file box and place them in another set of hanging files in a filing cabinet or drawer.


Don't Worry About Things

Don't worry about things. Don't push.  Just do your work and you'll survive.  The important thing is to have a ball, to be joyful, and to be loving and to be explosive.  Out of that comes everything and you grow.  All you should worry about is whether you're doing it every day and whether you're doing it every day and whether you're having fun with it.  If you're not having fun, find the reason.  You may be doing something you shouldn't be doing.

The gift is part; it's there, but you have to rehearse it for many years.  Doctors don't suddenly become doctors overnight.  They have something in there that comes out for some of them but it takes ten or fifteen years of rehearsal.  Just write every day of your life.  Read intensely.  Then see what happens.  Most of my friends who are put on that diet have very pleasant careers.

Ray Bradbury
January 1986

Tuesday, October 30, 2012

Time Management Tools and Techniques

1. Use a time planner. - Enable you to plan and organize your life.  Enable you to plan for the year, the month, the week, and for each day. Contains a master list, capture every task, goal, and required action as it comes up. Allocate task to various months, weeks, and days. Contains a calendar to which you transfer items from your master list. Contains a daily list which is the single most important planning tool you can have.

2. Always work from a list.  - Feeling overwhelmed?  Write down every single thing you have to do for the foreseeable future.

3. Organize your list by priority. - Organize the list items relative to its value in comparison to other things you have to do. 

4. Use any time management system you like. - Use it regularly until it becomes a habit, take time to learn and master it until it becomes a habit like breathing in and out.

5. Set up a 45-file system. - This is a tickler file that lets you plan and schedule for the next twenty-four months. Get a box of 45 files with 14 hanging files. Divide the forty-five files into thirty-one files numbered one through thirty-one for the days of the month.  There are twelve files for the months of the year, January through December. The last two files are for the next two years.

When you have an appointment or responsibility for six months from now, you simply drop it into that monthy file.  At the beginning of each month, you take out all your responsibilities for that month and sort them into your daily files, numbered one through thirty-one. Each day, you take out the file for that day and that becomes the starting point for your daily planning.

Seven Tools for Personal Organization - Time Power - Brian Taylor

1.  Prepare the night before. - Prepare your work list for the following day the evening or night before.  This exercise lets you sleep more soundly, clears your mind from having to remember what you are going to do the next day.

2. Schedule your time. - The very act of planning and organizing your day, week, and month gives you a greater feeling of control and well being. Increases self-esteem and improves sense of personal power.

3. Get an early start on the day. - The more time you take to sit, think, and plan, the better organized you will be in every area of your life. A few minutes of quiet reflection before you begin any undertaking can save you many hours executing the task.

4. Use an organized filing system. - The best and simplest of all filing systems is an alphabetical system. You should have a master list that gives you the title of each file and tells you where the file is located.  A Rolodex is a fine tool for this purpose, available at stationery stores.

5.  Do important work during prime time. - Do your creative work during your prime time when you are most alert and productive.

6. Use a dictating machine or tape recorder for correspondence and notes. - First write an outline of what you are going to dictate.  Jot down major headings and subheadings before you begin. Think through the sentence structure in your mind before you begin dictating onto tape.  Don't be afraid to go back, erase, and do it over again using a better choice of words. Second, don't try to be a perfectionist.  Third, concentrate on getting your thoughts dictated as quickly as possible, and then go back and clean it up before you finalize it. In no time at all, you will be dictating perfectly correct letters and reports that need no correction or editing at all.

7.  Make air travel productive. - If you plan ahead and organize your work before you leave for the airport, you can accomplish an enormous amount while you are in the air.

Monday, October 29, 2012

Time Power - Twelve Proven Principles for Peak Perfomance - Brian Taylor

Principle 1. Time management enables you to increase the value of your contribution. - Good self esteem comes from the knowledge that you are putting more into your life and work than you are taking out, that you are contributing more to your work than you are taking out.

Principle 2. Your rewards, both tangible and intangible, will always be equal to the value of your services to other people. - The more you put in, the more you get out. Through the Law of Sowing and Reaping, time management allows you to sow more and better, and therefore to reap more and better in every area of your life.

Principle 3. Good time management requires you see yourself as a factory. - Inputs, activities, outputs. Top performers focus on outputs, average performers focus on inputs, medium or low performers focus on activities.

Principle 4. Everything you accomplish, or fail to accomplish, depends on your ability to use your time to its best advantage.

Principle 5. Time is the scarcest resource of accomplishmnet.

Principle 6. The practice of time management skills allows you to develop judgment, foresight, self-reliance, and self-discipline.

Principle 7. A focus on time management forces you to be intensely results-oriented.

Principle 8. Time management enables you to work smarter, not just harder.

Principle 9. Good time management is a source of energy, enthusiasm, and a positive mental attitude. - As you see yourself accomplishing large quantities or work, you actually experience a continuous inflow of additional energy that enables you to accomplish even more.

Principle 10. You grow as a person in direct proportion to the demands that you place on yourself. - The self-discipline of time management builds character, confidence, and an unshakable belief in yourself and your abilities.

Principle 11.  Lasting motivation only comes from a feeling of achievement and accomplishment. - The more you get done, the better you feel about yourself, and the more eager you become to do even more.

Principle 12.  Now, this minute, is all the time you have. - If you manage yourself minute by minute, the hours and days will take care of themselves.  The more tightly you manage your time, the more you are guaranteed that it will translate into a great life that's hallmarked by purpose, power, control, and worthwhile accomplishment.

Saturday, October 27, 2012

Jungle of Life - Napoleon Hill

As revealed to Napoleon Hill by the Master:

"You have earned the right to reveal a Supreme Secret to others.  In the journey through life there is a Jungle of Life, a Black Forest through which every individual must pass alone. In the Black Forest he overcomes enemies and his own inner opposition and turmoil. The Black Forest helps to give refinement to the soul of man through sturggle and resistance, so that the soul may return to the Great Eternal Reservoir from whence it emerged and become a part of Infinite Intelligence.

"And now I shall name the enemies who must be met and conquered in the journey.

The foremost is FEAR.  The expression of fear denies man the use of his true power of thought - a power which can enable each individual to acquire all of his physical needs and control his earthly destiny.

The next great enemy is GREED for the possession of material things and for power to control others for selfish ends. No person who is filled with greed and avarice can pass through the Jungle of Life and successfully attain and use the Supreme Secret, for he affronts the Creator when he violates the rights of others.

INTOLERANCE is third on the list of enemies.  Intolerance is the evil partner of selfishness and ignorance.  It closes the mind and shuts out facts. It deprives a person of valuable friendships he will need in his journey through life and repels the co-operation of others.

EGOTISM is the fourth great enemy of man. Self-repect is a most desirable quality, but self-love is self-deceit and causes a man to lose respect for others.

LUST is the fifth enemy.  It prevents sex emotion from bewing properly transmuted and properly directed.  It leaads to excessive sexual expressions which dissipate the vital creative forces of mind and body.

ANGER, the sixth enemy, is a form of temporary insanity.  Righteous indignation that is controlled and directed toward the correction of a cause is occasionally necessary, but those who live with rage cannot truly know the Supreme Secret.

HATRED, the seventh enemy, is anger which has been allowed to dwell in the mind until it has hardened like so much cement. It is a mind-posion which erroneously twists the individual's thinking. One who harbors hate cannot control and direct his power of thought toward constructive ends and thus he is denied this one and only outright prerogative with which man has been blessed by the Creator.

The enemy of JEALOUSLY, that mixture of covetousness and fear.

IMPATIENCE, which prevents cause from bearing its fruit in effect.

DECEIT, which in the end deceives the deceiver.

FALSEHOOD, which weaves a noose with which the liar spiritually hangs himself.

The related enemy of INSINCERITY and VANITY, which makes men vulgar and forms a repulsive force.

CRUELTY, which attracts all the other enemies like a pack of wolves.

MERCILESSNESS, which turns its back on those in need and makes the soul shrivel.

INJUSTICE, SLANDER, and GOSSIP; one may know the Supreme Secret in words but can never use it if he ever attempts to destroy others.

The Black Forest closes in for a lifetime upon those who do not vanquish the enemies of UNDEPENDABILITY, DISHONESTY, DISLOYALTY and REVENGE.

"Four more enemies fully as important in their menace as any of the others; WORRY, which reveals that a man is no bigger than that which he allows to worry him; ENVY, a form of jealousy which most particularly destoys initiative and self-discipline; HYPOCHONDRIA, which prevents the mind from conceiving the continued good health of its bodily temple and so gives ill health its first foothold, which often is in the mind; and INDECISION, which grows stonger the more it is indulged until it rides one's back and one can fall and lie lost in the Black Forest.

"There are other enemies of man, but who conquers these twenty-six will conquer all the others. Know that one who seeks earnestly to conquer these twenty-six lurking enemies becames an Initiate of the Great School. We know him and he has access to the mind of a Master.  The means of communication is telepathy.  The Initiate may at times convey his need for instuction through what is commonly known as prayer.

Friday, October 5, 2012

Notes from the movie "Supercharge Your Immune System" by Gary Null

How to shop:

Collard Greens - a great source of chlorophyll
Carrots
Lettuce other than iceberg
Dandelion greens
Pear, eat one a day
Lemon, #1 anti-cancer food
Apple
Brussel Sprouts
Vegatarian hot dogs and hamburgers
Brown rice and beans
Tomatoes
Cabbage
Onions, simply wash and eat
Extra Virgin Olive Oil
Sprouts
Watermelon - 1 glass 3 times a day with lemon or grapefruit to detoxify
Sweet potatoes, yams
Cauliflower
Broccoli

Metropolitan Wellness Center

Wheat grass
Increase vitamin C
Green juices

Lung Detoxification - 10 parts water to 1 part juice of watermelon with lemon, lime, orange, or grapefruit and raw honey.

Celtic Sea Salt - evaporated sea water.  1/4 teaspoon with glass of water prior to going to bed and upon rising will help with getting up at night and frequent going to bathroom

Body brushing to stimulate lymph system.  Brush before showering to increase lymphatic drainage.  Use wood brush with natural bristles.

Reishi/Shitake Mushrooms
Raw garlic/onions lower blood pressure
Sprouts
Lemon juice keeps salad fresh
Cayenne pepper
Olive oil/balsamic vinegar
Oxygen rich foods are anti-cancer
Herbal coffee
Veggie Wash (Use to clean vegatables)
Pizza - crust from spelt flour, veggies, non-dairy cheese
Quiche - also use non-dairy cheese

Friday, September 28, 2012

Setting Goals with Peak Potentials

My notes from the "Setting Goals with Peak Potentials" webinar.

The psychology of Achievement, Brian Tracy

"Goal Setting and Achieving"

"Specific Process of selling"

If you want to be successful, write down your goals - literally life transforming.  Why is that?  Gotta set goals/plan. Why is so important.  Goals versus fantasies.

If you don't have a road map, you're lost.

Only 3% of people write goals, written.  The other 97% think they have goals.  Having goals lead to focus, now more than ever because of the internet social media  are more and more distracted.  Goals keep you on track, create greater energy. Barage of e-mail - text messages de;letes energy.  Kind of energy people show up with.

If you don't know where you are going, any road will get you there. Clear goals lead to a sense of clear focus, working toward them step by step.

Our conditioned mind's favorite pastime is to be right.  Thus achieving goals is the means to prove yourself right.  Success breads success.

Techniques for Goal Achievement.

Goals enable you to take control versus success being a matter of luck.

Harmonize the Law of Accident versus with the Law of the Universe.

Write down 10 goals, select one to focus on.

Write down 101 goals in a spiral notebook.  Example of a man who wrote down 101 goals and achieved them in 10 years.

Feeling listless, make a list.

Many people don't get what they want because they don't know what they want.  Be clear about your goals by writting them down. 3% write goals and make the money and ...

If you don't have goals, you will be like a dog chasing back and forth and be tried at the end of the day.

Clarity of intentions, focus single minded on one thing at a time.  Work on them one at a time. Goals/clarity enable focusing on one thing at a time and achieving thus making more energy.

- Set your goals, write them down and have a written plan that you are working on.
- Be nice to people
- Take care of yourself
- Learn anything you need to learn to achieve and accomplish your goals

People fail because of the fear of failure

Need to open yourself to fear and rejection in order to succeed

Need really clear goals

Example - If he quit after 5,000 rejections would have never succeeded.

The more you fail, the more you succeed.

The faster you fail, the faster you succeed.

Replace failure with feedback

No time to wait for later, until you remove the barrier of failure then you are toggling back and forth.

Learn to set clear goals at MMI.

Brian Tracy - 12 step method to seeting and achievingt your goals - free at www.briantracy.com/mindset

No charge - free.


Friday, August 24, 2012

Bob Dylan's Bus

Here's a couple of pics of Bob Dylan's tour bus(es) parked outside of the Wells Fargo Arena in Des Monies, Iowa on August 22, 2012 in a no parking zone. Ha!

The concert was titled "Bob Dylan and His Band".  Frankly, it was a terrible concert. I regret taking my wife and son.  They were polite enough to say they enjoyed it.  However, my son said the people sitting next to him must not have liked it because they didn't applaude and left early.  The lone person sitting next to me also left early.  He did not recognize Dylan on stage and asked which one he was, I said he was the one appearing to be singing. The folks with the floor seats dutifully stood during the entire performance.

 I can barely understand his singing any more.  His lyrics are almost totally incomprehensible these days.  You must guess what song he is singing by hopefully matching snippets to a previous rendition that you are familar with. You're totally in the dark if you can't match it to a previous song. This is unforunate as what I liked about the early Bob Dylan was the clarity of his lyrics; the subtle phrasings.   Now he simply growls constantly in a hoarse choactic monotone. I wonder if the constant touring has permanently ruined his vocal chords.  Anyone that sounds that hoarse must have a severe constant sore throat.

He played the electric piano alot.  Kinda jammed with the band sometimes.  Played with one hand, standing, and sitting down.  Walked around blowing the harmonic, held a guitar occasionaly.  Stood and waved with his free hand.  Donned a white brim hat for the last song, more the ready to make his exit I suppose.

He never announces what he is going to play. Never thanks the crowd for applause. There is no warmup act, there is no intermission.  There is never more than a one song encore; even that is planned into the set list. Never any new songs. He introduced the members of the band prior to the last two numbers. Blowing in the Wind is what he closes with.  Now is that some kind of joke? That's what you get for $49.50.

I doubt that he would have any success at all if this is what he had sounded like his during all his career.  He is most certainly riding on his past reputation and accomplishments.  I plan to remember this concert the next time Dylan comes my way and take a pass. I don't even want to hear his upcoming new release "Tempest" that includes the offer of a Bob Dylan Harmonica.  I can't even imagine that this release can possibly have any redeeming merits except to make Bob Dylan more money. There are no Bob Dylan signature guitars that I am aware.  Maybe that is still to come.

Geez, the old geezer should just hang it up.  Give the World a break, Bob. Park the bus for good.


43 views as of January 7, 2013.
46 views as of February 3, 2013
54 views as of March 10, 2013
119 views as of July 13, 2013
132 views as of July 26, 2013
150 views as of August 21, 2013
171 views as of October 30, 2013
206 views as of March 31, 2014
238 views as of November 25, 2014
266 views as of May 1, 2015
376 views as of March 18, 2018

Friday, April 20, 2012

Stewart MacDonald Herringbone Guitar Kit


This post concerns the construction of a kit guitar.  The particular kit is the Stewart MacDonald Herringbone Guitar.  This one is a dreadnaught style guitar with rosewood sides and back, spruce top, and mahogany neck.  This is the second Stewart MacDonald guitar kit that I have purchased.  Prior to this one, I built the Triple 0 Guitar kit by MacDonald with similar materials.  That guitar took one and one-half years to build.  Having assembled the tools and built the jigs required by the first kit and acquired experience with building a Stewart MacDonald kit, I am curious as to how long it will take to build a second Stewart MacDonald kit guitar. My initial goal is three months.  Other guitar building experience that I have included building a classical guitar at a luthier school from scratch.  That effort took three weeks.  I often say that was the hardest three weeks work in my life.  I am currently unconstrained by regular time obligations of a job.

Along the way, I plan to point out difficulties/uncertainties that I encountered in building the kit and perhaps help any fellow Stewart McDonald kit builders who happen upon this blog.

April 11, 2012

Pre-bent Rosewood Sides

Installing the Tail Block


The kit rose wood sides are bent and the quarter sawn book matched spruce top and rosewood bottom halves are glued together.

The kit instructions (CD and booklet)  indicate that the layers of cardboard are to be cut from the packing for the interior molds.  However, the interior mold forms are supplied pre-cut and there is no need to cut your own.  The precut forms are not to be used to align the neck block rather the cardboard packing is used for this.  I only used one full box top and used the sides of the box to form a double layer because I want to keep the full box bottom to hold the kit parts. 


 April 12, 2012


Installing the Neck Block

April 13, 20120

The following photos show slight misalignments in the ends of the neck and tail block with the sides as well as side with side wherein one is slightly higher than the other.  Not to worry, leveling of the kerfling with the sanding board, that you construcwill bring the neck and tail blocks and the abuttement of the sides into perfect alignment


The following photo shows installation of the kerfling.  This is not a very interesting shot of kerfling from this side admittedly.  However, note the tape on the inside of the brace that hold the sides of the guitar.  This is an innovation of mine.  The tape holds pieces of cardboard next to the plywood and provides a cushion to slide up and down the guitar sides.  Without this padding, the sides of the guitar are likely to get scratched when sliding the brace on and off the sides as they contact the plywood of the brace even though the arms have been rounded by filing.  I noticed this when building the Triple-0. For the Herringbone I also cut the opening a little to large and needed to compensate for that, so I used Gorilla(tm) tape over cardboard and discovered this provided a padding feature and liked it so I did not cut another brace. The interior height of the brace for the Triple-0 needs to be about one-half inch shorter than described in the booklet.  The interior brace dimensions in the booklet are the same for the Triple-0 and the Herringbone.  However the sides of the Herringbone are taller than those of the Triple-0. You'll discover this when the braced is attached and the guitar is laying top side down when attempting to glue on the back.  I used an additional board screwed across the open to shorten the brace arms rather than cut another brace. At this time, it appears I could have just cut the ends of the brace off by about a half-inch.  The width of the Herringbone and Triple-0 guitars at the waist are different so a separate brace is required for each kit.

April 14, 2012
Kerfling Leveled

This photo shows the leveled kerfling.  I did not include a picture of the sanding board used to level the kerfling along the sides and the neck and tail blocks.  Constructing the wedges with 5 and 1 1/2 degrees slopes for the ends of the sanding board requires some inguenity since measuring 1 1/2 degrees is rather small.  I used trig tangent function to determine the respective rise for 8 inch run. This step eliminates the minor errors in gluing up the sides and neck and tail blocks.  Installing kerfling calls for leaving the kerfling sticking above the sides by 1/32 inch, "proud" as woodworkers commonly say.  I discovered that my small six inch rulers is 1/32 inch thick and so used the edge of this ruler to set the rise of the kerfling above the side and end blocks.  Sanding the kerfling on the Herringbone was much easier for me than on the Triple-0.  Perhaps it was because the kerfling was more accurately placed or was it that I realized the instructions for drawing atop the sides with the white pencil meant atop the sides of the rosewood and not atop the kerfling itself.

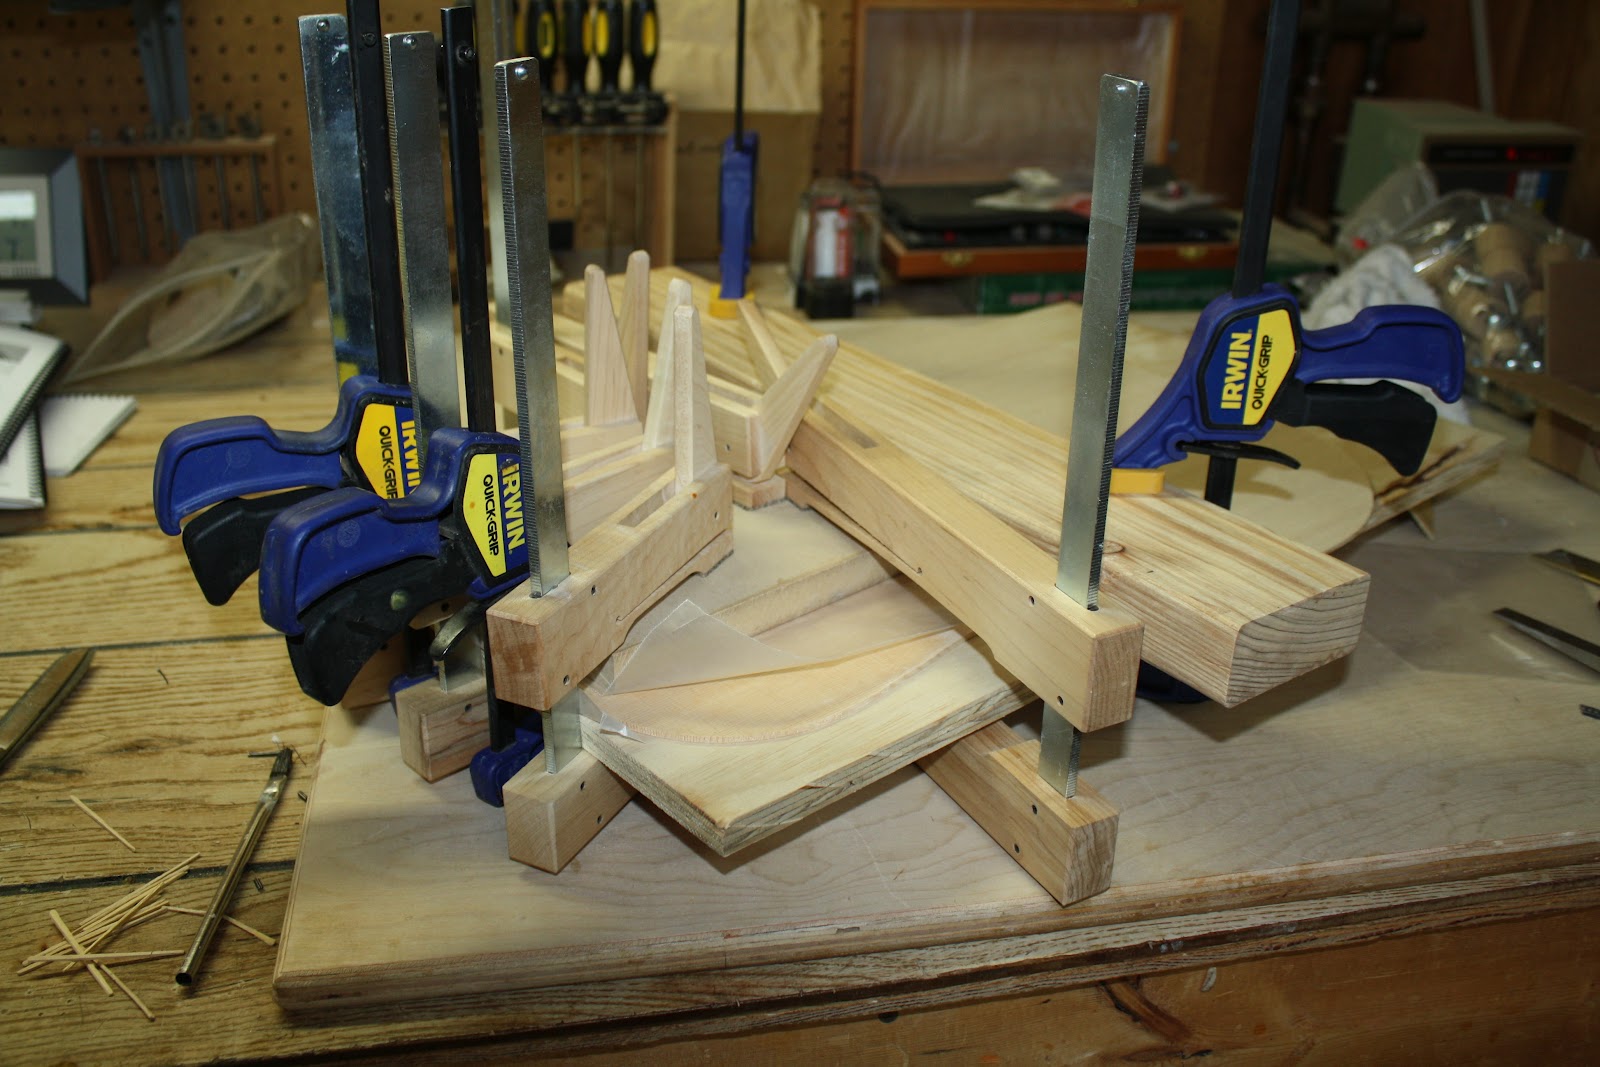
Installing the top braces
 Notice the additional flat piece of plywood that serves as the top brace caul.  This needs to be a fresh piece of plywood to avoid maring the spruce top.  Gluing the braces to a flat surface seems counter intuitive to me since there is supposed to be a 1 1/2 degree arch in the top.  I'm not sure exactly what top brace piece is being installed in the above.  One thing that you will learn as you glue the braces in is that they have a tendency to slide once glue and clamping pressure is applied.  You need to consider this in planning your clamp placement sequence.  Clamping the ends of the braces first tend to make then more stable when clamps are added in the middle.  Reversing this order is almost guarenteed by make the braces start moving around. .  Also, it is possible to clamp small cauls next to the braces for alignment purposes and remove them once the glued brace is in place. The 45 degree cuts in the main braces for the sound bars and bridge plate to fit into need to be slightly generous since they will fill with a little bit of glue when they are glued down.

April 15, 2012

More pictures of top brace installation.  These are all dry clamped.  I find this part of the kit construction to be especially enjoyable.


Ready for Top Installation

Note the razor saw in foreground, very useful for guitar construction.  Accurate triming of braces, etc.


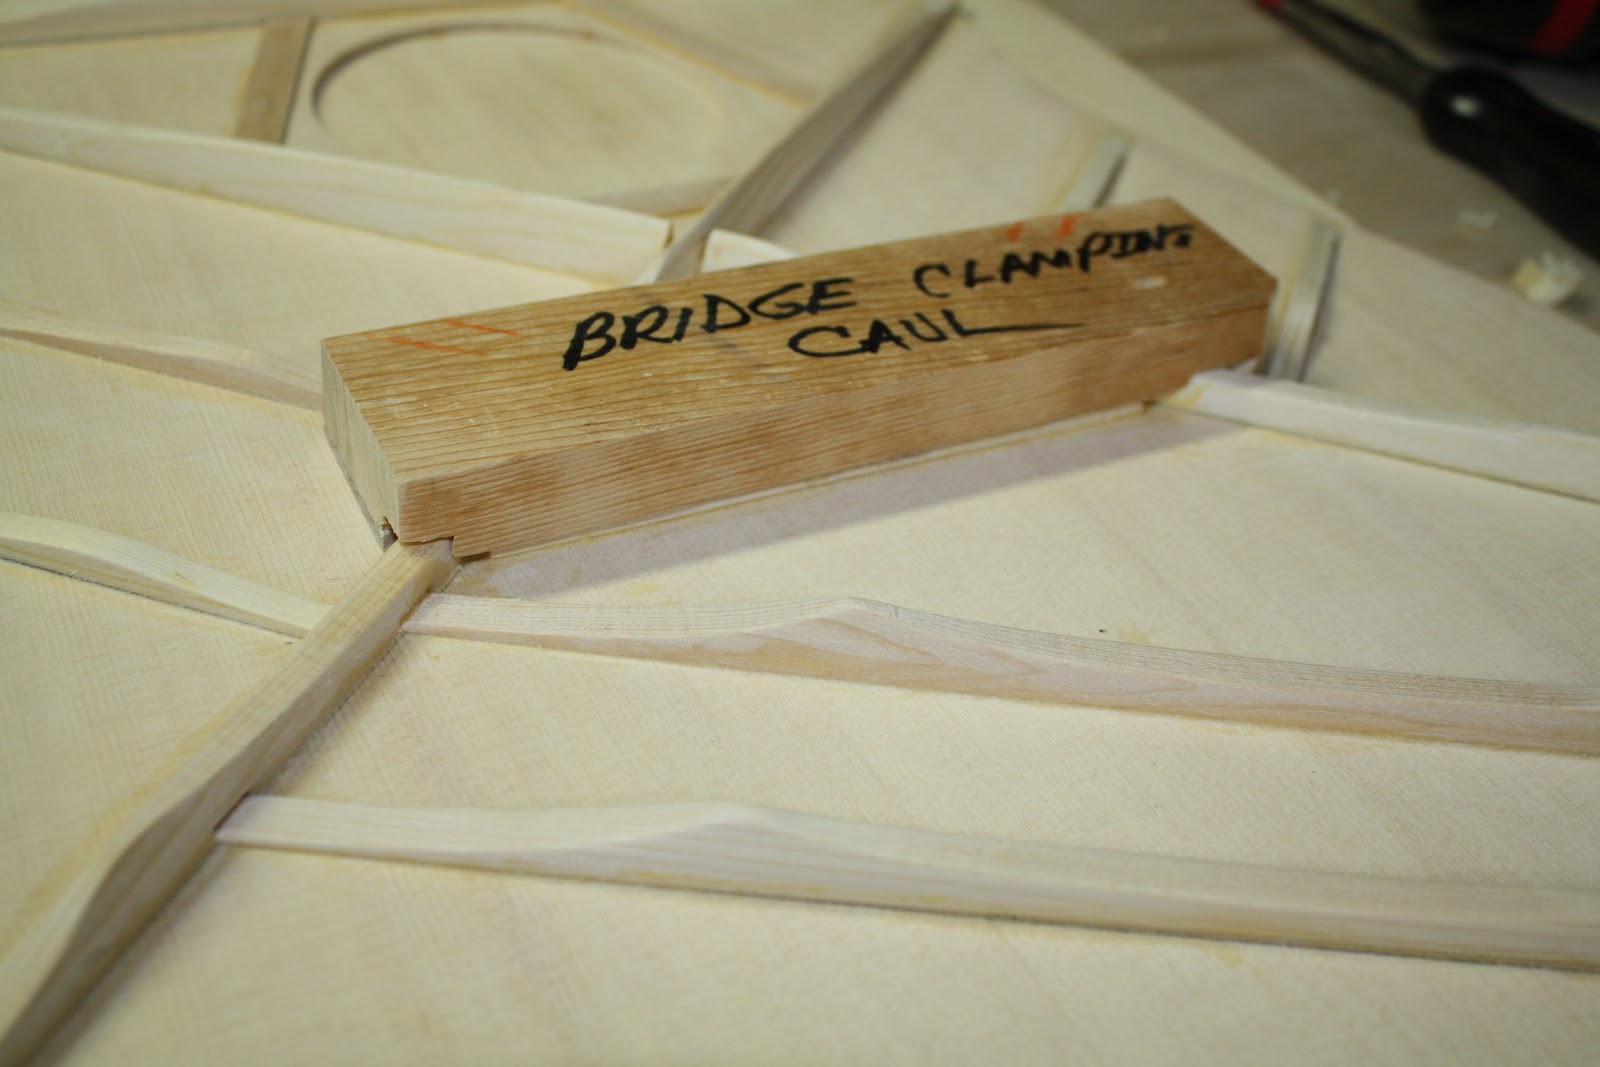
Top braces glued in place.  Bridge clamping caul laying atop the braces.  This will be used to install bridge on the top side of the top much later.  Notice the maple corners which are glued at the corners of the the bridge clamping caul.  These are made from the bridge plate material according to the directions which I have a hard time understanding.  The picture in the booklet does not clearly indicate that there are three levels to this caul, but there are.  I cut the channels, installed the corners, and recut the channels in the maple corners to avoid trying to cut and install the small triangular pieces.  The Herringbone bridge clamping caul is significantly different than that of the Triple-0.  The Triple-0 bridge plate is longer in the waist dimension than that of the Herringbone.  There is only one channel in the Triple-0 bridge clamping caul that I constructed.  The picture in the booklets are the same for the Herringbone and Triple-0 however.

The following picture shows the bridge clamping caul in position.

The shoulder brace caul to be used later in attaching the fingerboard is the same for the Herringbone and Triple-0. 

Aligning the top to mark the channels to be cut for the brace ends.  At this point I noticed that the body of the Triple-0 is specified as 3/8 inch longer than that of the Herringbone which I found curious.  The body of the Herringbone is deeper and wider and thus has more volume but the body is shorter.  The Triple-0 has 12 frets to the neck whereas the Herringbone has 14. I believed the Triple-0 to be a smaller guitar, but the body is longer, odd.

I reverted to mounting the guitar on the top brace caul to position and align the top on the sides to mark the locations for the top brace channels in the sides.  I made a slight mistake in that I cut the top brace ends flat to 100/1000 ths (0.1 inch) rather than following the arc of the braces.  I made this same mistake on the Triple-0.  While this may not be noticeable in the finished product, it could be argued that flat brace ends contribute to a more flexible top or a less strong top.  The effect is probably inconsequential .  I also discovered that one of my small files is 3/32 (0.09375) inches thick.  I used this to gauge thinning of the brace ends.

April 18, 2012


Channels for brace ends cut in rosewood sides.


Neck channel for bolt on neck cut open.  The Triple-0 has the dove tail neck which I had a hard time fitting.  I opted for bolt on neck for the Herringbone hoping that the installation will be easier.


I experienced the top sliding around once glue and clamp pressure is applied while building the Triple-0.  I decided to try installing two small 1/8th inch dowels in the top and neck block to anchor these pieces together while I glued the top onto the sides.  This worked real well.  These pins will be hidden by the fingerboard once it is installed. 


Another picture of the two small pins.  Notice the channels in the kerfling and the spool clamps strategically placed for gluing on the top.  I dry ran clamping the top at least two times as recommended by the directions.


The top is glued on looking just like Stewart MacDonalds pictures.  The work stand is my router table which is proving convienent for building the guitar kit as you can access all sides easily and it is a comfortable height, at least for me, of 44 inches.

April 19, 2012

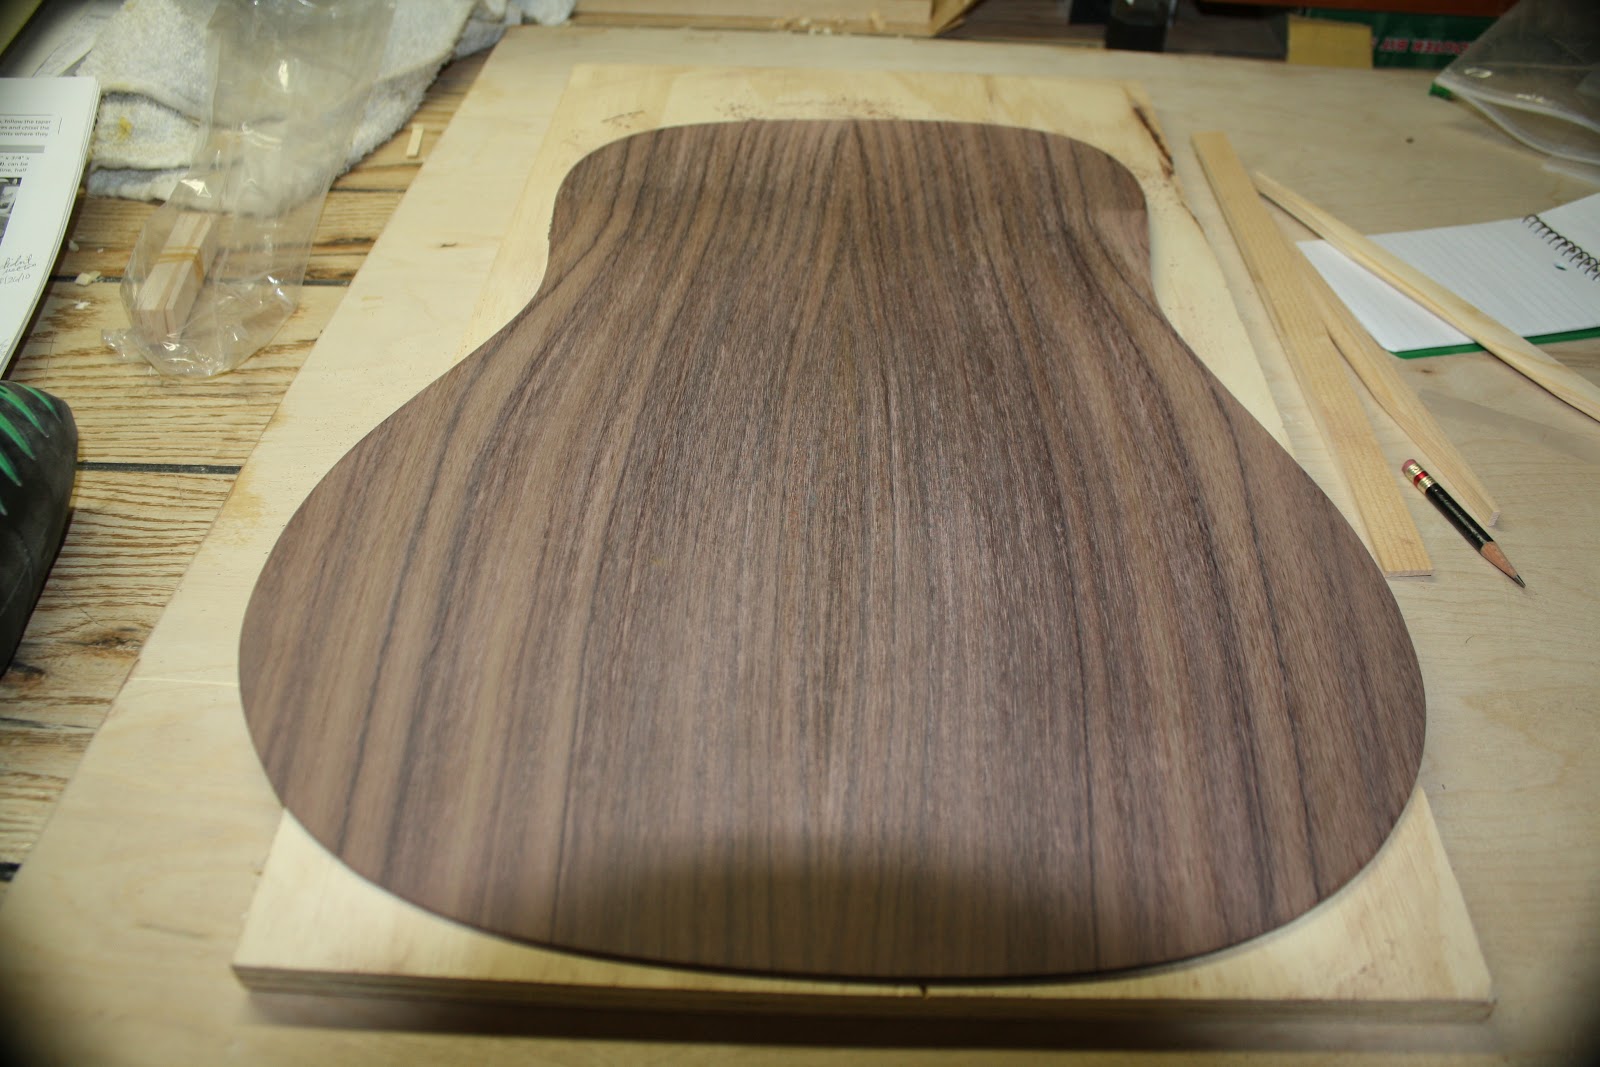
While the top is drying, I began work on the back.  The kit includes the halves cut and glued.  This piece includes a lot of curvature and should be rather striking once it is finished.  This is the good side, it will be on the outside of the guitar.


Another view of the router table with top glued on.

April 20, 2012

Installation of Back Braces


Beginning of glueing back braces to back.  The back caul provides for the curvature of the back.  This curvature is the same for the Herringbone as the Triple-0 so I did not have to make a new caul. The small metal clamp anchors alignment blocks to keep the back brace from moving around once glue and clamping pressure are applied.  While not visible, there is a similar alignment block clamped on the other side.  I don't recall how I solved this for the Triple-0 but there is a definite issue with keeping the braces in the desired position when glueing. 


Alignment blocks and clamps removed.


I trimmed the top overhang with a utility knife, razor saw, and file while waiting for the back braces to dry.  I only have one back brace caul so need to do four clamping sessions for the back braces plus five clamping sessions for the back strips.


May 19, 2012


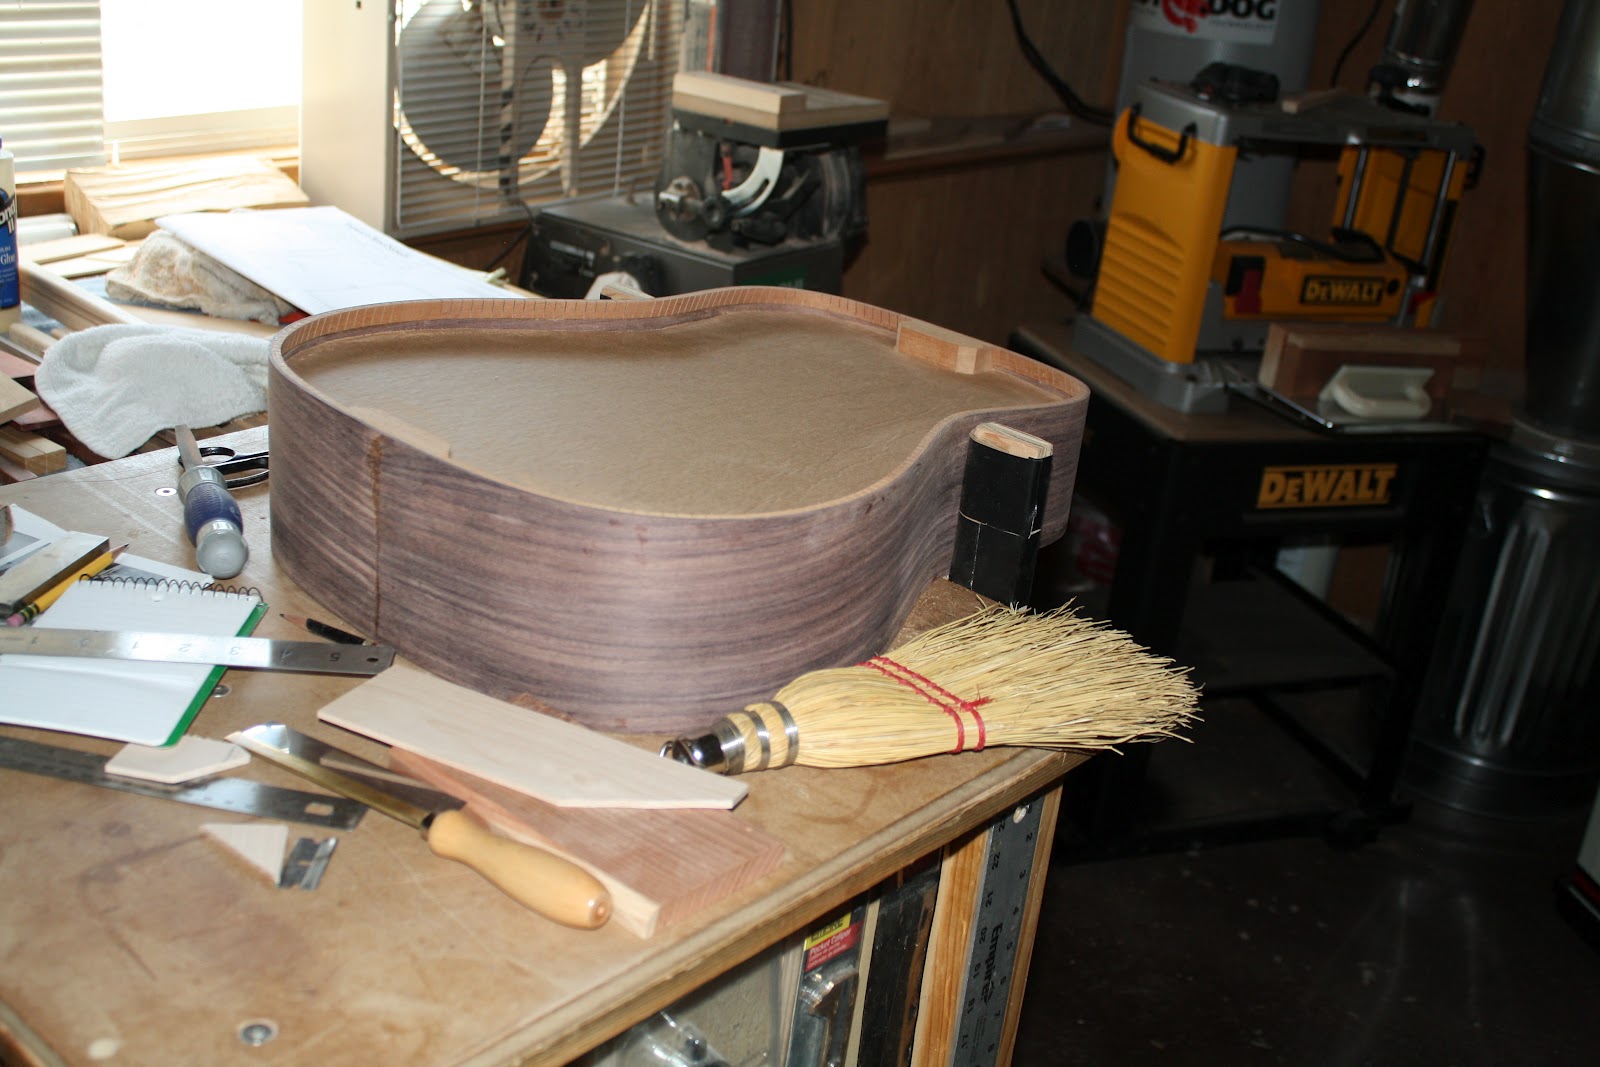
 The body is finished.

June 2, 2012


My previous attempts at detailing the difficulties I encountered in routing the channels for the purfling came to naught as I hung the text entry by attempting to insert a picture.  Perhaps I edited for too long a time.  Anyway the jig that I bought for this purpose did not work on this dreadnaught guitar. The angle of the back was too great to allow the router to ride up along the back.  Plus there is an issue with the body being warped.  I'm not sure how this happened but the resting the body on its side so that the upper bout and lower bouts touch reveals a distinct difference depending on the whether the left or right side is down. In addition the top does not have a symmetric arch.  Lying a straight edge diagonally from the upper to the lower bout reveals that the top is arched on one side but not on the other.  This also complicated attempts at using the jig.  I therefore resorted to free-hand cutting the channels using the Bosch Colt edge trimmer router and the Stew-Mac cutter and router bear set with careful measurements facillatated by the digital micrometer.  I used a "five-degree" wedge for the base of the router on the back as prescribed in the manual and DVD.  I determined the "five-degree" angle by eye-balling.   It turned out just fine.  A little apprehension at approaching the guitar with a whirling router knowing that a misguided router cut could ruin the guitar top or back beyond repair. Scraping and sanding to remove the dried glue and smooth the binding to match the edge of the guide was the final step in prepping the top for finishing.  I also use a straight edge razor blade in this process, it makes a dandy mini-scraping - a tip I picked up somewhere.  Applying finish to the top must wait until the neck is finished and fit to the body, else scraching of the body would surely occur. 


May 19, 2012

 The finished body, awaiting neck fitting prior to finishing.

May 21, 2012 

Building the neck first proceeds by trimming the pre-slotted fingerboard to fit the neck.


May 23, 2012

Installing the side dots is next.

May 24, 2012

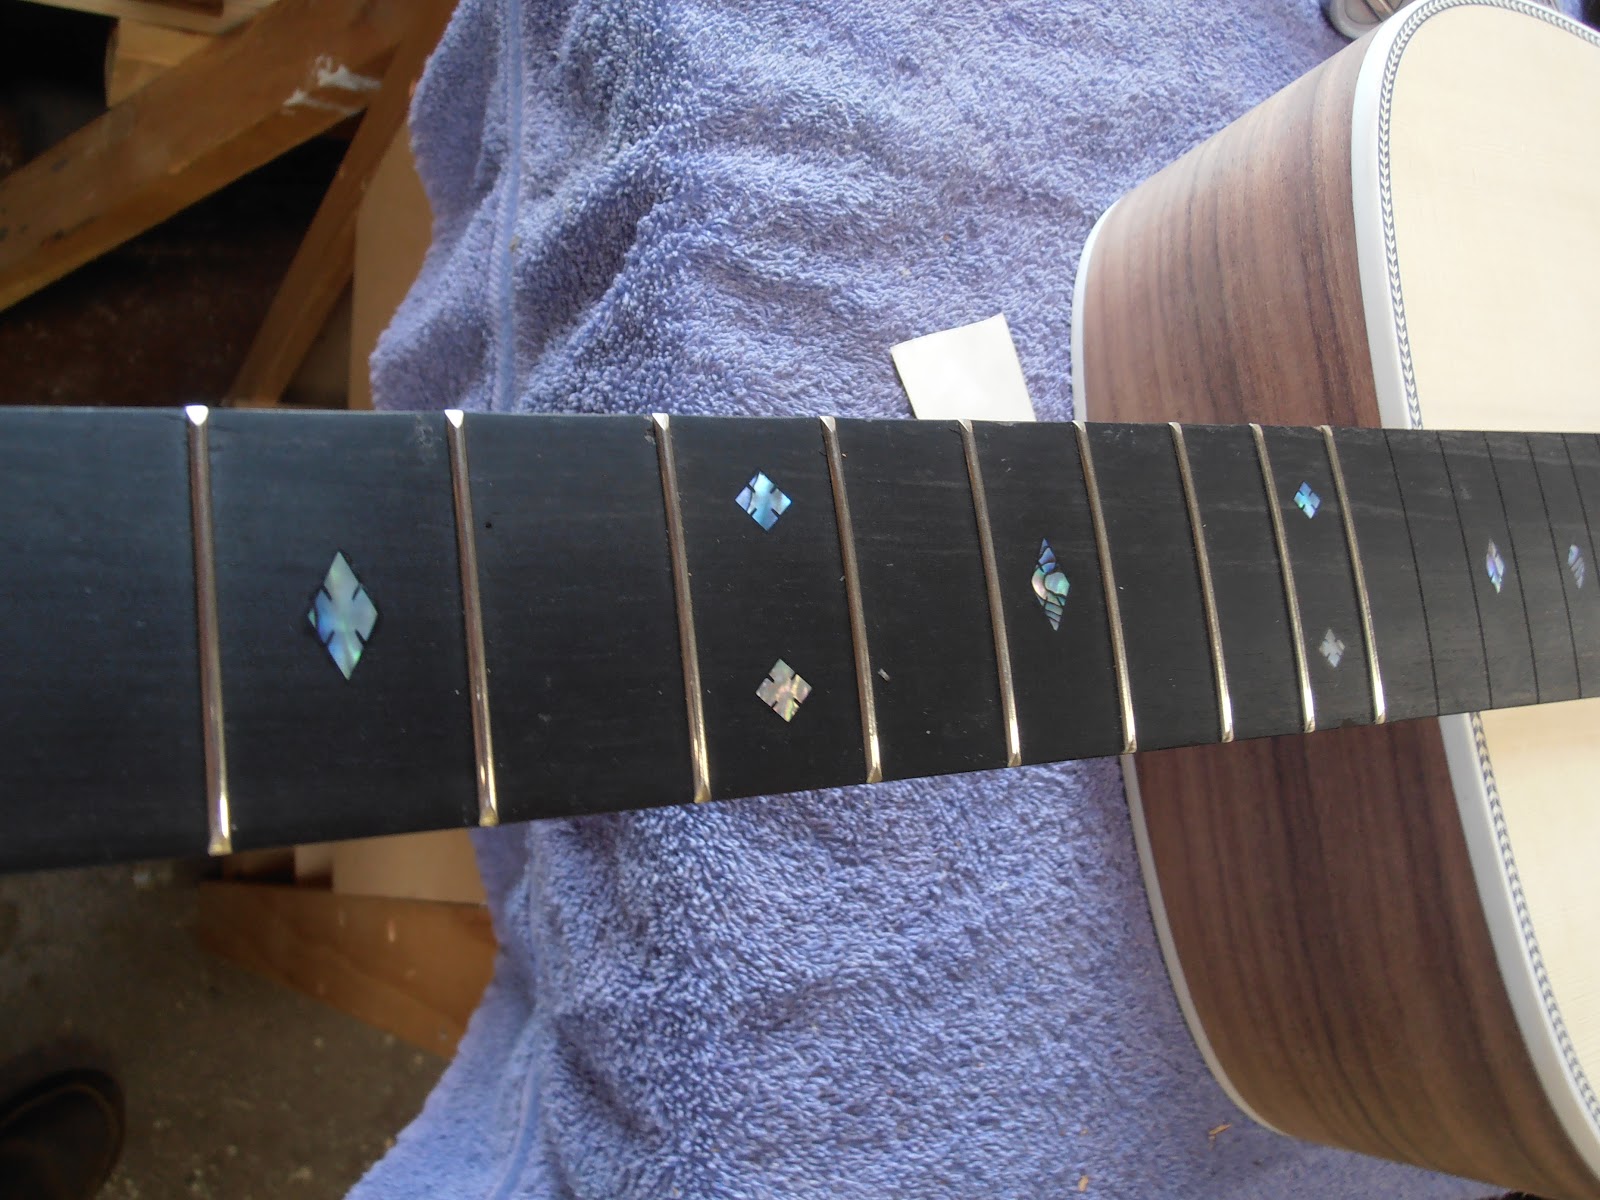
Installing the the fretboard inlays is the next step.  The kit provides mother of pearl dots.  My experience with building the Triple O included installing Abalone diamonds and squares which are much more striking in appearance.  Thus I elected to install Abalone diamonds and squares in the fretboard of the Herringbone guitar.  I used an X-acto knife and a 1/8th inch chisel to dig the openings for the inlays.  A more exacting appoarch would be to use a router and 1/32th router bit.  Installing the inlays with blackened epoxy makes it possible to hide inexactness of the cuts.  Starting with a paper pattern overlaid with a tracing of the individual diamond and square taped to the fretboard provides an accurate starting for cutting the hold for the inlay.  The Triple O directions indicated starting with a drilled hole and then squareing the edges which worked okay.  Using a pattern is more exact for smaller inlays.


 Close up of diamond inlay in its hole prior to glueing.

May 26, 2012
 The inlay holes without the inlay

June 2, 2012 
Finished inlays.  They were glued in with structual slow set Epoxy colored with black color.  Using Ebony dust for coloring is another possibility. The inlays were then scraped and sanded smooth with the fretboard surface.  A black oil dye was applied to the fretboard in an attempt to hide the natural light brown discorations in the Ebony.  I've had mixed results with attempting to darken Ebony.  This application worked better than on the fretboard I built for the Triple O.  Sanding to 220 grit is recommended per the directions, sanding to 320/400 makes the fretboard feel smother at this point.  Whether finer sanding results in smoother feeling action remains to be seen.


This customization step slowed down the time schedule for the overall guitar. I need to complete the neck by the end of June to meet my goal of building the guitar in three months.

 June 4, 2012 

Working on the peghead requires having the tuners available, I needed to order a set.  I selected the Waverly nickel vintage tuners with ebony buttons from Stew Mac.  Once I had the tuners, I proceeded to ream the holes for the bushings using my available reamer.  Eventually I realized that the reamer was not going to cut the hole large enough at which point I noticed that the reamer I was using was the bridge/end pin reamer, not the peghole reamer as pictured in the directions and DVD.  Yuk, that means I cut a incorrect hole that needs patched.  I subsequently considering ordering the Stew-Mac Peg hole reamer at $113.65 but instead decided to try the peg hole bushing reamer at $17.25. Cost is a consideration at some point. The exact size might be an issue since the Stew-Mac page for these items writes that the 0.340 inch size is intended for Waverly Tuners while the specifications for each tuner indicate 0.348 inches widest diameter. How to reconcile these two different measurements?

June 16, 2012

Once again I lost text updates while uploading images.  If blogger wasn't free, I'd attempt to do something about it besides select update more often.  Geez...

So there I was reparing the peghole that I reamed out with the wrong reamer and then drilling out the tuner holes with a 1/4th inch bit using a the drill press. Prior to gluing the fretboard onto the neck, I gave it a coat of the black oil dye from Stew Mac in an attempt to hide the brown in the ebony.  This doesn't work very well, the brown is still visible. I also coated the peghead rosewood veneer pan since this particular piece of  rosewood was very uneven varying from purple to tan.  Sanding removed a lot of the black but not all.  I considered binding the peghead to hide some chips in the edges but can't quite decided how to do it so I'll pass on that diversion.


The incorrectly reamed out tuner hole which is still too small for the tuner bushing.


Except for this side, the reamed out hole is way too big for the tuner shaft.


Patching the incorrect tuner hole with a hardwood dowel sanded to a taper.  Building a guitar is a matter of hiding one's mistakes.


Tuner hole patch from the other side.


Fret board after black oil dye treatment.  Notice how nicely the diamonds and squares inlays sparkle.


Preparing to glue the fretboard onto the neck using the  Stew Mac technique of inducing a slight downward bow by securing the peghead in padded vice jaws and raising the tail end with a stick which compensates the upward bow in the fretboard induced by installing frets.
Gluing the fretboard to the neck as prescribed by Stew Mac.  This approach works really well, the resultant neck appears to be perfectly flat.


The fretboard is now glued onto the neck and the diamonds and squares are still sparkling.


The peghead holes are drilled for the bushings and enlarged for the tuner shafts.  I can't imagine that the $113 peghead reamer would work better than the $17.50 drill reamer or whatever they're called.


The next step is fitting the neck to the body.  As shown in the DVD and manual, this appears to be a relatively easy step.  However, I spent considerable effort in obtaining the desired alignment of the neck with the bridge.  The step of cutting the channels along side the tenon is complicated by the fact that one is chiseling end grain.  This is not as easy as it seems because the wood is tough and removing wood appears to be reveal wet wood underneath. Which, of course is ridiculous.  Letting the cut sit over night does seem to make it easier to cut briefly.  The tenon does not appear to be perfectly centered in the heel of the neck.  I resorted to slightly shaving the end of the tenon in both dimensions as well as scraping the mortise channel in the body to obtain my final fit.  It appears that the height of the tenson matches the depth of the mortise exactly so it was necessary to alter the joint slightly, contrary to the Stew Mac directions. I found this true on the dove tail neck joint of the Triple O also which required even more alteration. 

I wonder if this is a manisfestation of the top lacking the prescribed bow due to method that the top braces are installed.  If I build another Stew Mac kit, I'll use a go-bar deck to install the top braces.

 It's also helpful to press down on the neck into the body mortise channel when dry fitting to get the neck extension to fit closely to the body top..

 The final fit is not "perfect" where the body meets the tail of the neck as the line of a crack is visible.  I eventually obtained 4/32nds equal spacing on both outside bridge holes with a straight edge held against the neck side and exact alignment with the straight edge on the neck top to the top of the bridge.


The nut and bolt of the bolt on neck visible throught the soundhole.


Dry fit neck.

 Heel to body fit, looks better in picture than it really is.


Fit of heel to body on the other side, notice chip at the top.  I considered installing a piece on binding on this joint but the inner heel has been cut to a narrow ridge and there may not be enough material to cut a channel for the binding.


Fretboard inlays still looking nice!


91 views as of 1/13/2013
107 views as of 2/3/2013
130 views as of 2/24/2013
139 views as of 3/10/2013
193 views as of 7/13/2013
199 views as of 7/25/2013
209 views as of 8/21/2013
379 views as of 3/31/2014
514 views as 11/25/2014